Building blocks
In the first chapter we will elaborate on how Nextflow is designed, its advantages and disadvantages, the basic components, etc.
Introduction
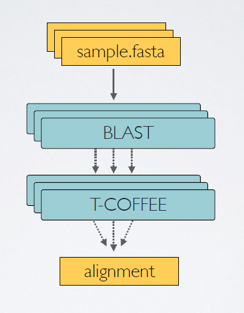
Writing pipelines to automate processes is not something new. In the data/ folder we’ve written a bash script that can download some extra data (note: originally we wanted to use this data, however due to low resources on our VMs we have already installed some other data in the data/ folder). These bash scripts are probably one of the oldest forms of pipelines where we concatenate processes. Let’s have a look at another example:
#!/bin/bash

blastp -query sample.fasta -outfmt 6 \
	| head -n 10 \
	| cut -f 2 \
	| blastdbcmd -entry - > sequences.txt
Starting with a shebang line, the blastp command is piped through multiple times to eventually result in an output file sequences.txt.
What is the downside of similar relatively simple pipelines?
There are a couple of suboptimal things happening here:
Will it use the available resources optimally?
Which versions of the tools are being used?
Will it work on my machine (cfr. installation of tools)?
Can we scale it to HPC clusters or Cloud environments?
What if the pipeline fails somewhere in the middle, we need to restart the pipeline from the beginning?
In response to that, workflow managers such as Nextflow were built, aimed to deal with more complex situations. Nextflow is designed around the idea that Linux has many simple but powerful command-line and scripting tools that, when chained together, facilitate complex data manipulations.
By definition, Nextflow is a reactive workflow framework and a programming Domain Specific Language that eases the writing of data-intensive computational pipelines[1]. Nextflow scripting is an extension of the Groovy programming language, which in turn is a super-set of the Java programming language. Groovy can be considered as Python for Java in a way that simplifies the writing of code and is more approachable.

Why (not)?
Nextflow is not the only player in the field[2], however there are good reasons to opt for it.
Parallelization: processes are automatically scheduled based on available resources
Scalability: simple scaling from local to HPC-cluster usage
Portability: run across different platforms
Reproducible: native support for containers, conda environments, and interaction with Git.
Re-usability: with the introduction of modules it becomes (theoretically) simple to re-use processes written in other pipelines
Community[3]: even though the community is never a reason why to choose for a tool (functionality is more important), it is still very relevant to know that when you are facing problems, there are people out there ready to help you out.
Some thoughts or disadvantages from my personal point of view. It takes some time to get used to the syntax of the Groovy language. As flexible as it is, as complex it gets. Often it’s difficult to trace down the exact problem of a failure of a pipeline script, especially in the beginning. It’s probably not the first thing you should be concerned of if you’re doing a one-time analysis.
Main abstractions
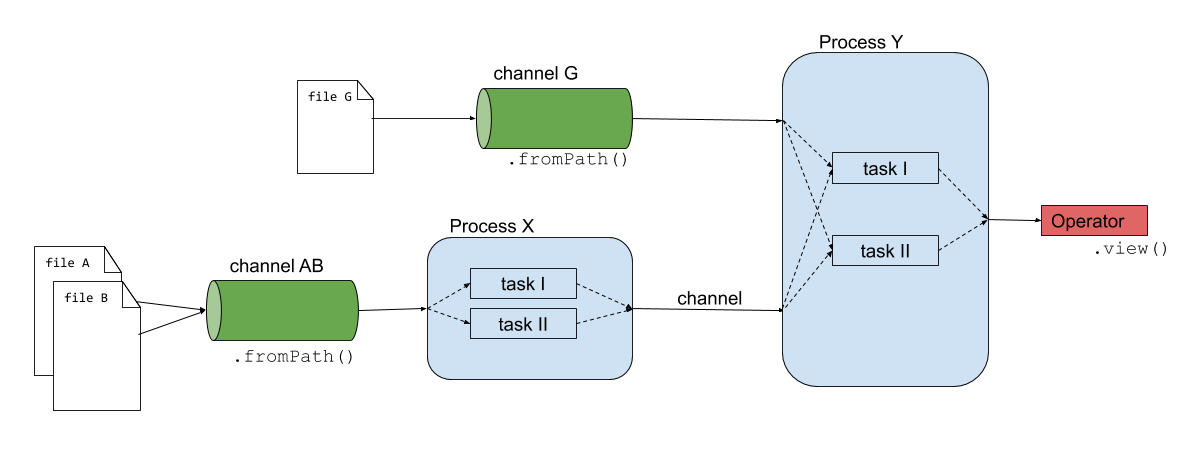
Nextflow consists of four main components: channels, operators, processes and workflows.
Channels: contain the input of the workflows used by the processes. Channels connect processes/operators with each other.
Operators: transform the content of channels by applying functions or transformations. Usually operators are applied on channels to get the input of a process in the right format.
Processes: define the piece of script that is actually being run (e.g. an alignment process with STAR).
Workflows: call the processes as functions with channels as input arguments, only processes defined in the workflow are run. Workflows were introduced in DSL2.
The script firstscript.nf is using these three components and gives an idea of how Nextflow scripts are being build.
#!/usr/bin/env nextflow
nextflow.enable.dsl=2

// Creating channels
numbers_ch = Channel.from(1,2,3)
strings_ch = Channel.from('a','b')

// Defining the process that is executed
process valuesToFile {
    input:
    val nums
    val strs

    output:
    path 'result.txt'

    """
    echo $nums and $strs > result.txt
    """
}

// Running a workflow with the defined processes
workflow{
    valuesToFile(numbers_ch, strings_ch)
}
Note
Besides these main building blocks, we also already highlight the existence of the params parameters. In the previous code block we explicitly defined some input values in the channels. However, we can define the input values into a parameter instead, that is passed on to the channel.
// create a parameter 'input_read'
params.input_read = '/path/to/read_1.fq'

// use the input_read parameter as an input for the channel
input_read_ch = Channel.fromPath(input_read)
Here params.input_read = '/path/to/read_1.fq' will create a parameter input_read and give it the value '/path/to/read_1.fq' which is used as an input for the channel. We will later see that these parameters can then be overwritten on runtime.
1. Channels
The input of the analysis is stored in a channel, these are generally files like sequencing, reference fasta, annotation files, etc. however the input can be of any kind like numbers, strings, lists, etc. To have a complete overview, we refer to the official documentation[4]. Here are some examples of how a channel is being created:
# Channel consisting of strings
strings_ch = Channel.from('This', 'is', 'a', 'channel')

# Channel consisting of a single file
file_ch = Channel.fromPath('data/sequencefile.fastq')

# Channel consisting of multiple files by using a wildcard *
multfiles_ch = Channel.fromPath('data/*.fastq')
These channels can then be used by operators or serve as an input for the processes.
Inspect and edit the template.nf script. Create a channel consisting of multiple paired-end files. For more information, read fromFilePairs.
Once the Nextflow script is saved, run it with: nextflow run template.nf.
The solution is available in the file template-paired-end.nf.
Note that the content of the channel is constructed in a following manner:
[common-name, [/path/to/read1.fq, /path/to/read2.fq]]
This is a tuple qualifier which we will use a lot during this workshop and discuss later again.
2. Operators
Operators are necessary to transform the content of channels in a format that is necessary for usage in the processes. There is a plethora of different operators[5], however only a handful are used extensively. Here are some examples that you might come accross:
collect: e.g. when using a channel consisting of multiple independent files (e.g. fastq-files) and need to be assembled for a next process (output in a list data-type).
Channel
    .from( 1, 2, 3, 4 )
    .collect()
    .view()

# outputs
[1,2,3,4]
mix: e.g. when assembling items from multiple channels into one channel for a next process (e.g. multiqc)
c1 = Channel.from( 1,2,3 )
c2 = Channel.from( 'a','b' )
c3 = Channel.from( 'z' )

c1 .mix(c2,c3)

# possible output
a
1
2
b
3
z
Create a channel from a csv-file (input.csv). Generate the channel for the input.csv-file which you can find in the exercises/01_building_blocks/ folder and contains the following content:
sampleId |
Read 1 |
Read 2 |
|---|---|---|
01 |
data/ggal_gut_1.fq.gz |
data/ggal_gut_2.fq.gz |
02 |
data/ggal_liver_1.fq.gz |
data/ggal_liver_2.fq.gz |
Test your Nextflow script with: nextflow run <name>.nf.
The solution is available in the file template-csv.nf
The file is imported with .fromPath(), followed by the splitCsv() operator where we set the header to True. The last step will output how the channels are constructed. Each row is transformed into a tuple with the first element as a variable sampleId, the second as forward_read and the third as reverse_read.
samples_ch = Channel
                .fromPath('input.csv')  // make sure that the path towards the file is correct
                .splitCsv(header:true)
Additionally, you can use the following expression to view the contents in a clean way:
samples_ch.view{ row -> tuple(row.sampleId, file(row.forward_read), file(row.reverse_read)) }
3. Processes
Processes are the backbone of the pipeline. They represent each individual subpart of the analysis. In the code-snippet below, you can see that it consists of a couple of blocks: directives, input, output, when-clause and the script itself.
process < name > {

   [ directives ]

   input:
    < process inputs >

   output:
    < process outputs >

   when:
    < condition >

   [script|shell|exec]:
   < user script to be executed >
}
Each process is executed independently and isolated from any other process. They communicate via asynchronous FIFO queues, i.e. one process will wait for the output of another and then runs reactively when the channel has contents.
Here are a couple of examples of processes:
Creating an output file results.txt with inputs from channels nums and strs
process valuesToFile {
    input:
    val nums
    val strs

    output:
    path 'result.txt'

    script:
    """
    echo $nums and $strs > result.txt
    """
}
Quality control process with fastqc
process fastqc {
  input:
  tuple val(sample), path(reads)

  output:
  path("*_fastqc.{zip,html}")

  script:
  """
  fastqc ${reads}
  """
}
Quantifying in mapping-based mode with salmon
process salmon_quant {
    input:
    path index
    tuple val(pair_id), path(reads)

    output:
    path pair_id

    script:
    """
    salmon quant --threads $task.cpus --libType=U -i $index -1 ${reads[0]} -2 ${reads[1]} -o $pair_id
    """
}
Trimming adapters & quality filtering with trimmomatic
process trimmomatic {
    // directives
    publishDir "$params.outdir/trimmed-reads", mode: 'copy', overwrite: true
    label 'low'
    container 'quay.io/biocontainers/trimmomatic:0.35--6'

    input:
    tuple val(sample), path(reads)

    output:
    tuple val("${sample}"), path("${sample}*_P.fq"), emit: trim_fq
    tuple val("${sample}"), path("${sample}*_U.fq"), emit: untrim_fq

    script:
    """
    trimmomatic PE -threads $params.threads ${reads[0]} ${reads[1]} ${sample}1_P.fq ${sample}1_U.fq ${sample}2_P.fq ${sample}2_U.fq $params.slidingwindow $params.avgqual
    """
}
The input declaration block defines the channels where the process expects to receive its data. The input defenition starts with an input qualifier followed by the input name (more information). The most frequently used qualifiers are val, path and tuple, respectively representing a value (e.g. numbers or strings), a path towards a file and a combination of input values having one of the available qualifiers (e.g. tuple containing a value and two files).
Warning
The keyword from is a remainder of DSL1 and is not used in DSL2. Therefore we can neglect this keyword in this course even though we will see it appears a lot in older tutorials (and in the official Nextflow documentation).
The output declaration block defines the channels created by the process to send out the results produced. They are build similar as the input declarations, using a qualifier (e.g. val, path and tuple) followed by the generated output. The output of a process usually serves as the input of another process, hence with the emit option we can make a name identifier that can be used to reference the output (as a channel) in the external scope. In the trimmomatic example we can access the generated filtered and trimmed paired reads in the external scope as such: trimmomatic.out.trim_fq.
Directives are defined at the top of the process (see trimmomatic example) and can be any of the following long list of possibilities. We can define the directory where the outputs should be published, add labels or tags, define containers used for the virtual environment of the process, and much more. We will discover some of the possibilities along the way.
Conditionals are not considered in this course.
A script, as part of the process, can be written in any language (bash, Python, Perl, Ruby, etc.). This allows to add self-written scripts in the pipeline. The script can be written in the process itself, or can be present as a script in another folder and is run from the process here.
#!/usr/bin/env nextflow

process python {

    script:
    """
    #!/usr/bin/python3

    firstWord = 'hello'
    secondWord = 'folks'
    print(f'{firstWord} {secondWord}')
    """
}
Check the output of the script in the .command.out file of the work-directory.
Earlier, we described that Nextflow uses an asynchronous FIFO principle. Let’s exemplify this by running the script fifo.nf and inspect the order that the channels are being processed.
N E X T F L O W  ~  version 20.10.0
Launching `fifo.nf` [nauseous_mahavira] - revision: a71d904cf6
[-        ] process > whosfirst -
This is job number 6
This is job number 3
This is job number 7
This is job number 8
This is job number 5
This is job number 4
This is job number 1
This is job number 2
This is job number 9
executor >  local (10)
[4b/aff57f] process > whosfirst (10) [100%] 10 of 10
A tag directive can be added at the top of the process definition and allows you to associate each process execution with a custom label. Hence, it is really useful for logging or debugging. Add a tag for num and str in the process of the script firstscript.nf and inspect the output.
The process should be adapted, containing the following tag line in the directives.
// Defining the process that is executed
process valuesToFile {
    tag  "$nums,$strs"

    input:
    val nums
    val strs

    output:
    path 'result.txt'

    """
    echo $nums and $strs > result.txt
    """
}
When you execute the pipeline, the processes overwrite into one line and it is not very clear in which hashed work directory the outputs are. Therefore, you can use the following to follow the execution of your pipeline:
nextflow run firstscript.nf -bg > nf.log
tail -f nf.log
4. Workflows
Defining processes will not produce anything, because you need another part that actually calls the process and connects it to the input channel. Thus, in the workflow, the processes are called as functions with input arguments being the channels.
The output that is generated in a process, needs to be emited (emit) in order to serve as an input for a next process. The trimmomatic process defined above emits the paired trimmed and unpaired trimmed (not passing the filtering thresholds) reads as two separate outputs, resp. trim_fq and untrim_fq. The following workflow calls the trimmomatic process with reads as its input channel. Now we an access the output of this process using trimmomatic.out.trim_fq.
workflow{
    trimmomatic(reads)
}
Extra exercises
Use the view operator on the output of the valuesToFile process in the script firstscript.nf. For this, you will first need to add an emit argument to the output of the process. More information is available in the documentation here.
...
process ...
    output:
    path 'result.txt', emit: result_ch
...


// Running a workflow with the defined processes
workflow{
    valuesToFile(numbers_ch, strings_ch)
    valuesToFile.out.result_ch.view()
}
You need to execute a hypothetical task for each record in a CSV files. Write a Nextflow script containing the following:
Create a channel for the input (
input.csv):Read the CSV file line-by-line using the
splitCsvoperator, then use themapoperator to return a tuple with the required field for each line. Finally use the resulting channel as input for the process.
Create a process that:
Accepts a tuple as input channel with the information from the csv-file.
Has the following script:
echo your_command --sample $samplevariable --reads $readvariable1 $readvariable2
Create a workflow that calls the process with the input channel.
Given the file input.csv (in the exercises folder) with the following content:
sampleId |
Read 1 |
Read 2 |
|---|---|---|
01 |
data/ggal_gut_1.fq.gz |
data/ggal_gut_2.fq.gz |
02 |
data/ggal_liver_1.fq.gz |
data/ggal_liver_2.fq.gz |
Find the solution also in split-csv.nf. Inspect the command that has ran in the intermediate work/ directory following the hashed folders and look in the file .command.sh.
#!/usr/bin/env nextflow
nextflow.enable.dsl=2

params.input_csv = 'input.csv'

samples_ch = Channel
                .fromPath(params.input_csv)
                .splitCsv(header:true)
                .map{ row -> tuple(row.sampleId, file(row.forward_read), file(row.reverse_read)) }

process split_csv {
    input:
    tuple val(sampleId), file(read1), file(read2)

    script:
    """
    echo your_command --sample $sampleId --reads $read1 $read2
    """
}

workflow{
    samples_ch.view()
    split_csv(samples_ch)
}
Futher reading on DSL2
Nextflow recently went through a big make-over. The premise of the next version, using DSL2, is to make the pipelines more modular and simplify the writing of complex data analysis pipelines.
Here is a list of the major changes:
Following the shebang line, the nf-script wil start with the following line:
nextflow.enable.dsl=2(not to be mistaken with preview).When using DSL1 each channel could only be consumed once, this is ommited in DSL2. Once created, a channel can be consumed indefinitely.
A process on the other hand can still only be used once in DSL2
A new term is introduced:
workflow. In the workflow, the processes are called as functions with input arguments being the channels.Regarding the processes, the new DSL separates the definition of a process from its invocation. This means that in DSL1 the process was defined and also run when the script was invoked, however in DSL2, the definition of a process does not necessarily mean that it will be run.
Moreover, within processes there are no more references to channels (i.e.
fromandinto). The channels are passed as inputs to the processes which are defined and invoked in theworkflow.