Creating our first pipeline
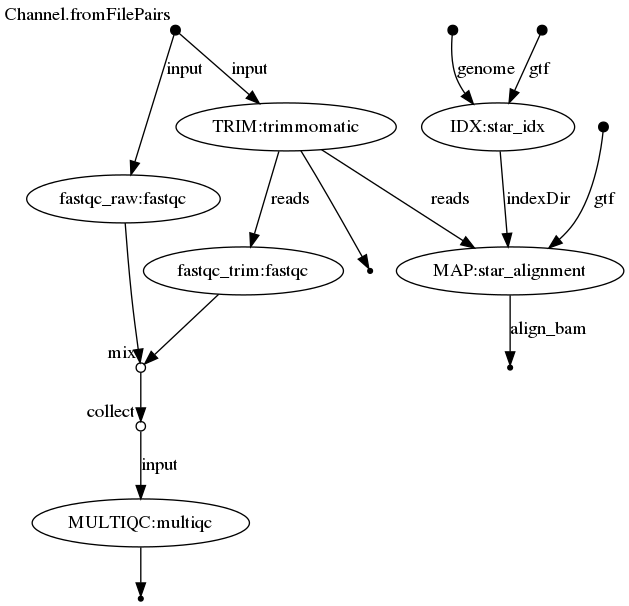
In this chapter we will build a basic RNA-seq pipeline consisting of quality controls, trimming of reads and mapping to a reference genome (excl. counting). We will build the pipeline step by step, starting from quality control with FastQC. The figure below was generated with Nextflow and represents the processes that we will build and the overview of the dataflow from the beginning to the end of the workflow.
Quality control with FastQC
The following script can be found and run in fastqc_1.nf.
#!/usr/bin/env nextflow
nextflow.enable.dsl=2

params.reads = "$launchDir/../../data/*.fq.gz"

/**
 * Quality control fastq
 */

reads_ch = Channel
    .fromPath( params.reads )

process fastqc {

    input:
    file read

    script:
    """
    fastqc ${read}
    """
}

workflow{
    fastqc(reads_ch)
}
The first line of our script is always a shebang line, declaring the environment where the OS can find the software (i.e. Nextflow). Generally, the input files and parameters of the processes are first assigned into parameters which allows flexibility in the pipeline. Input files are then assigned to channels and they serve as input for the process.
Note
$launchDir: The directory from where the script is launched (replaces$baseDirin version >20).There is a great flexibility in the Nextflow (Groovy) language: writing of whitespaces, newlines where channels are created,…
Let’s first run this script with the following command. If you have htop installed, keep an eye on the distribution of the workload and notice how Nextflow parallelises the jobs.
nextflow run fastqc_1.nf
Note
Make sure that the tool fastQC is installed. Conda is already installed and activated, it allows us to easily install fastqc with the following command conda install -c bioconda fastqc.
In the following steps we will add new features to this script:
Overwrite the parameter
readson runtime (when running Nextflow on the command-line) so it only takesggal_gut_1.fq.gzas an input read.Additionally, FastQC generates an html- and zip-file for each read. Where are the output files located?
nextflow run fastqc_1.nf --reads path/to/ggal_gut_1.fq.gzThe output files are stored in the
work/directory following the generated hashes. The hash at the beginning of each process reveals where you can find the result of each process.
Change the the script in order to accept & work with paired-end reads. For this we will need to:
Adapt something in the reads parameter (
params.reads)Change how the channel is generated
Change the
inputdeclaration in the process (frompathto atuple).
The solution is given in fastqc_2.nf. Note that if you run this script, only two processes will be launched, one for each paired-end reads dataset.
Run the script with: nextflow run fastqc_1.nf -bg > log. What does the -bg > log mean? What would the advantage be?
Run in the background and push output of nextflow to the log file. No need of explicitly using nohup, screen or tmux.
Check if the files exist (checkIfExists) upon creating the channels and invoke an error by running the nextflow script with wrong reads, e.g. nextflow run fastqc_1.nf --reads wrongfilename.
Result: fastqc_3.nf
Control where and how the output is stored. Have a look at the directive publishDir. Nextflow will only store the files that are defined in the output declaration block of the process, therefore we now also need to define the output. Put a copy of the output files in a new folder that contains only these results.
Result: fastqc_4.nf.
Without any additional arguments, a hyperlink will be created to the files stored in the
work/directory, with mode set to copy (mode: 'copy') the files will be made available in the defined directory.If the output is to be used by another process, and the files are being moved, they won’t be accessible for the next process and hence you’re pipeline will fail complaining about files not being present.
Warning
Files are copied into the specified directory in an asynchronous manner, thus they may not be immediately available in the published directory at the end of the process execution. For this reason files published by a process must not be accessed by other downstream processes.
The final FastQC script is given in fastqc_final.nf.
Quality filtering with trimmomatic
Now we will add the next step in our pipeline, which is trimming and filtering the low quality reads. For this process, we will use the tool trimmomatic.
The fastqc.nf script was extended with the trimmomatic process and is available in trimmomatic.nf.
A number of parameters have been added related to the trimmomatic process
The process
trimmomaticwith its inputs and outputs and the script has been createdThe
workflownow also contains the process trimmomatic, called as a function
In the output declaration block, we are introducing a new option: emit. Defining a process output with emit allows us to use it as a channel in the external scope.
At this point we’re interested in the result of the trimmomatic process. Hence, we want to verify the quality of the reads with another fastqc process. Re-run fastqc on the filtered read sequences by adding it in the workflow of trimmomatic.nf (remove the last commented line in the workflow). Use the parameter -resume to restart the pipeline from where it stopped the last time.
Hmm, error? Process fastqc has been already used -- If you need to reuse the same component include it with a different name or include in a different workflow context. It means that processes can only be used once in a workflow. This means that we need to come up with a smarter solution (see below).
Modules
Uptil now, we have written the processes and the workflow in the same file. However, if we want to be truly modular, we can write a library of modules and import a specific component from that library. A module can contain the definition of a function, process and workflow definitions.
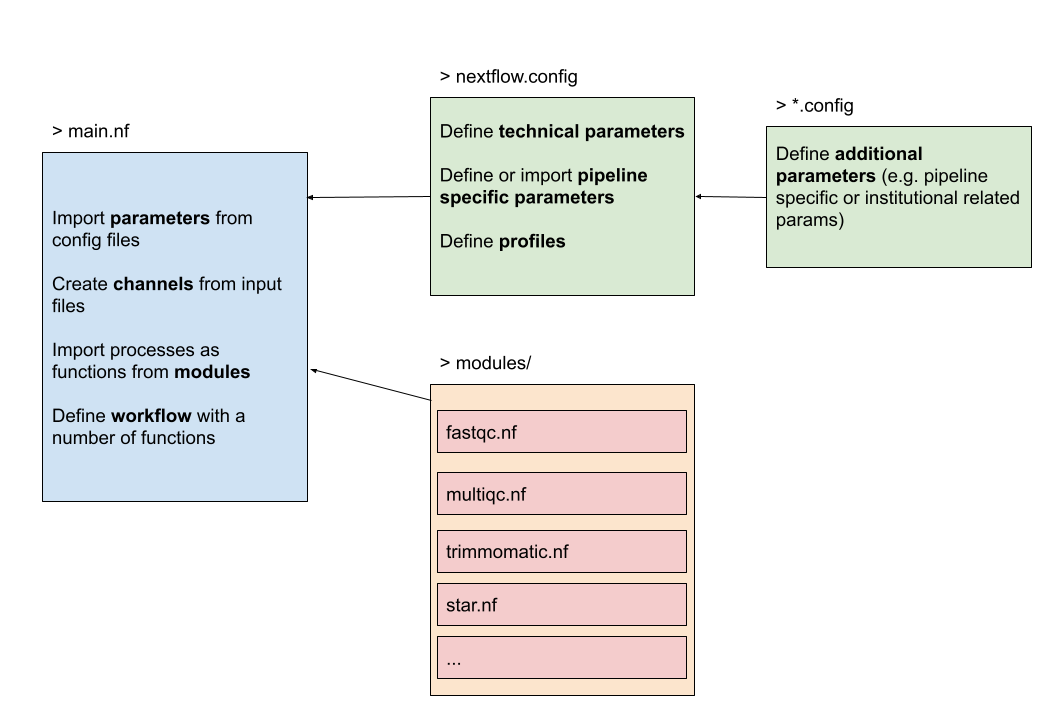
The figure below gives an overview of how the structure would look like. On the left we have the main Nextflow script (main.nf) that defines the parameters, channels and the workflow. It imports the processes from the modules, in this case available in a folder modules/. The configuration files nextflow.config will be discussed in the next chapter.
A module is generally imported with
include {<process-name>} from 'path/to/modules/script.nf'
with <process-name> the name of the process defined in the script.nf. The origin of the module defined by a relative path must start with ./, alternatively use launchDir to use the absolute path. Navigate to the modules folder and find a script called fastqc.nf. This script consists of a process and a workflow. This module can be imported into our pipeline script (main workflow) like this:
include {fastqc} from 'path/to/modules/fastqc.nf'
This doesn’t overcome the problem that we can only use a process once. However, when including a module component it’s possible to specify a name alias. This allows the inclusion and the invocation of the same component multiple times in your script using different names. For example:
include { fastqc as fastqc_raw; fastqc as fastqc_trim } from "${launchDir}/modules/fastqc"
Now we’re ready to use a process, defined in a module, multiple times in a workflow.
Investigate & run the script modules.nf which contains the following code snippet
...
include { fastqc as fastqc_raw; fastqc as fastqc_trim } from "${launchDir}/../../modules/fastqc"
include { trimmomatic } from "${launchDir}/../../modules/trimmomatic"

// Running a workflow with the defined processes here.
workflow {
  read_pairs_ch.view()
  fastqc_raw(read_pairs_ch)
  trimmomatic(read_pairs_ch)
  fastqc_trim(trimmomatic.out.trim_fq)
}
Similarly as described above, we can extend this pipeline and map our trimmed reads on a reference genome. First, we’ll have to index our reads and afterwards we can map our reads. These modules are called from the main script RNAseq.nf.
In the folder modules/ find the script star.nf which contains two processes: star_index and star_alignment. Complete the script RNAseq.nf so it includes these processes and hence the pipeline is extended with an indexing and alignment step. The parameters used in the modules are already defined for you.
Solution in RNAseq_final.nf. The following lines were added.
genome = file(params.genome)
gtf = file(params.gtf)

include { star_idx; star_alignment } from "${launchDir}/../../modules/star"

workflow{
  ...
  star_idx(genome, gtf)
  star_alignment(trimmomatic.out.trim_fq, star_idx.out.index, gtf)
}
In the folder modules/ find the script multiqc.nf. Import the process in the main script so we can call it as a function in the workflow. This process expects all of the zipped and html files from the fastqc processes (raw & trimmed) as one input. Thus it is necessary to use the operators .mix() and .collect() on the outputs of fastqc_raw and fastqc_trim to generate one channel with all the files.
include { multiqc } from "${launchDir}/../../modules/multiqc"

workflow {
  ...
  multiqc((fastqc_raw.out.fastqc_out).mix(fastqc_trim.out.fastqc_out).collect())
}
This pipeline is still subject to optimizations which will be further elaborated in the next chapter.
Subworkflows
The workflow keyword allows the definition of sub-workflow components that enclose the invocation of one or more processes and operators. Here we have created a sub-workflow for a hypothetical hisat aligner.
workflow hisat{
  hisat_index(arg1)
  hisat_alignment(arg1, arg2)
}
These sub-workflows allow us to use this workflow from within another workflow. The workflow that does not cary any name is considered to be the main workflow and will be executed implicitly. This is thus the entry point of the workflow, however alternatively we can overwrite it by using the -entry parameter. The following code snippet defines two sub-workflows and one main workflow. If we would only be interested in the star alignment workflow, then we would use nextflow run pipeline.nf -entry star.
workflow star{
  take:
  arg1
  arg2
  arg3

  main:
  star_index(arg1, arg2)
  star_alignment(arg1, arg2, arg3)
}

workflow hisat2{
  take:
  arg1
  arg2

  main:
  hisat_index(arg1)
  hisat_alignment(arg1, arg2)
}

workflow {
  star(arg1, arg2, arg3)
  hisat2(arg1, arg2)
}
Note
The take: declaration block defines the input channels of the sub-workflow, main: is the declaration block that contains the processes (functions) and is required when to separate the inputs from the workflow body. These options are useful when the workflow is growing with multiple entry-levels to keep a tidy overview.
Extra exercises
Extend the workflow pipeline with a final note printed on completion of the workflow. Read more about workflow introspection here.
The solution is given in RNAseq_final.nf
Adapt the RNAseq_final.nf script so it uses Salmon as an aligner and quantifier. In our temporary solution the alignment with Star has been replaced with Salmon, it would be better to create a subworkflow so you can choose upon -entry to work with Star or Salmon.
The solution is given in RNAseq_salmon.nf.
Write a Nextflow script for a tool that you use in your research. Use the same approach with parameters, channels, process in a module, and a workflow.
If you are stuck, don’t hesitate to ask for help!